Cinnamon Buns

Tags

, , ,


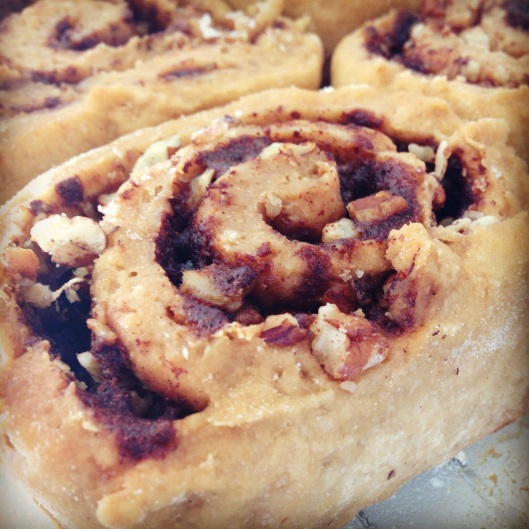
Cinnamon BunsNovember on the prairies, and winter is absolutely coming. We always seem to take a Paleo break this time of the year. It starts with pumpkin pie at Thanksgiving and ebbs and flows depending how well we’re coping with the snow and cold, usually until a post-Christmas emotional crisis. This year we are facing our pattern directly, planning a November Whole 30 and cross-country ski lessons, but we’ve also been carefully attending to our impluse to eat comforting treats. We have thirty years each of winter traditions to contend with so there is little point pretending that our cravings aren’t there. What we’re trying to do is be selective and smart, so that we don’t end up playing the emotional eating game with ourselves where we deny, deny, deny, then go crazy Halloween through New Years, just to limp along feeling crappy until we do a major diet purge again in January. That’s a lot of stress on our guts and minds that we don’t want this year. It’s a shift from accepting all-or-nothing Paleo dogma to accepting that our body-mind connection occasionally needs some off-spec treatment. This cinnamon bun recipe is an adaptation of one we found online, which was an adaptation of an adaptation of an adaptation. We can’t take full credit for it, but our tweaks minimize the fuel for your sugar dragon, and maximize the comforting smell and flavour. These are great make-ahead for brunch too.

Ingredients

  • 2/3 cup coconut milk
  • 1 tbsp unsalted butter*
  • 1 packet quick-rise yeast
  • 1/4 cup coconut palm sugar
  • 1/2 cup potato starch
  • 1/2 cup brown rice flour
  • 1/2 cup almond flour
  • 1/4 cup tapioca starch
  • 1/2 tsp baking soda
  • 1 1/2 tsp guar gum
  • 2 1/2 tsp baking powder
  • 1/2 tsp salt
  • 1 large egg (or equivalent)
  • 1/4 cup extra virgin olive oil
  • 1/2 tsp vanilla

Filling:

  • 1/3 cup unsalted butter*
  • 1/2 cup coconut palm sugar
  • 2 tbsp cinnamon
  • 1/2 cup pecans

*coconut oil should work equally well, if you don’t want to use butter

Method

Having a proper stand mixer is essential to this recipe. Borrow one, barter with your best friend for use of hers, do whatever it takes.

Grease a 9×11″ pan with coconut oil and dust with rice or coconut flour. Place the yeast and 1/4 cup of palm sugar in the bowl of the stand mixer. In a saucepan, or in the microwave, melt the butter in the coconut milk. Use the classic inside-of-the-wrist test, or a thermometer to test the temperature. Too hot or too cold and the yeast won’t do what it’s supposed to, you want it just warmer than body temperature (approx 40C, 110F). Add the milk mixture to the yeast and sugar, mix gently with a wooden spoon and then leave it alone to work for 15 minutes.

Sift or whisk the flours, starches, baking soda, powder, salt and guar gum together in a small bowl.

When the yeast is proofed, add the egg and oil and vanilla to the mixer. Mix on low for a few seconds, then turn the mixer up to medium while you slowly add the flour mixture. Once the flour has started to stick, turn the mixer up to medium-high and let it run for at least a minute and a half. The dough will come together, lose the sticky gluten-free look, and gain elasticity. If it doesn’t, let it run for up to two minutes.

Get your largest cutting board and wrap it completely with good plastic wrap. Wrap all the way around underneath the board, you don’t want it sliding off while you roll. Dust the board with flour and turn the dough out into the centre. Dust the dough with more flour, then cover it with more plastic wrap, so that you’ve completely covered the whole board again. Gently roll the dough out into a rectangle, until it’s half a centimetre thick or so. Carefully peel off the top layer of plastic wrap.

For the filling, place the butter, coconut sugar and cinnamon in a small bowl. Use a pastry cutter to work it into a crumble. Use a mortar and pestle to crush the pecans into small pieces (or chop them finely) and stir them into the sugar mixture. Sprinkle the mixture evenly over the surface of the dough.

To roll up your buns, unwrap the bottom layer of plastic wrap from your cutting board, and turn it so you have a narrow end of the rectangle towards you. Carefully pull the wrap up and way from you, then use your fingers to gently tuck the edge of the dough in on itself, starting a tight roll of dough on dough. Turn the board around, so now the rolled edge is farthest from you and you can pull the plastic wrap towards you, continuing to the familiar log form. Get it as tight as you can on your first go, because it won’t unstick to let you try again! Once you’ve got your roll finished, dust it one more time with some flour, then use dental floss to slice it into eight sections. Don’t worry if you’ve got mint floss, we did too and it didn’t add any flavour to the dough. This is a way easier technique than flouring the blade of a knife, but if you’re out of floss you can do that too (we won’t tell your dentist).

Place the rolls in the prepared pan, and let rise for 15 minutes. At this point, if you’re baking them off right away, you want to preheat your oven to 350F. If you are going to bake them the next morning, cover them with plastic wrap and refrigerate after rising. Let them come up to room temperature the next day before baking.

Bake for 20-25 minutes, or until the tops are golden brown. Cool in the pan on a wire rack, but definitely serve while still warm. If you’re feeling especially indulgent, we recommend a cream cheese icing sweetened with maple syrup, and spiked with ginger and cardamon.

Bon appétit!

Righteous Chicken

Tags

, , , , ,

Righteous Chicken

We have officially completed our first Whole30! Squeaky-clean eating for a whole month, with the assurance that it would change our lives for the better. Which is a pretty big deal, considering our lives were awesome before.

Our hardest days have come at the beginning and the end of the thirty days. We battled our sugar cravings and wrestled the various feelings we had been using food (and wine!) to cope with. It wasn’t pretty, but it wasn’t awful either. Then there were two solid weeks of practice, diligent work, patient effort. Then, in the last 72 hours, a rage-full monster emerged. “Why am I not feeling better?!” “Why is my skin not looking better?!” “Why do I not have a six-pack?!” Turns out the key to having a life-changing Whole30 was to take good measure of “life” at the start so we would have something quantifiable to compare to at the end. “Before” pictures, baseline performance, number of hours slept, you know, the SMART goals type stuff.

We did nothing of the sort.

No, we were all loosey-goosey with our intention for our Whole30 because, and this is so ridiculous in retrospect, it’s because we were secretly expecting everything to get better. Like magic. Maaaaa-gic.

Lesson one: living with intention requires defining the intention. (Gawd we can be such idiots sometimes!)

What has happened over the past 30 days has been less of a magical transformation, keep-calm-igand more of a down-and-dirty negotiation between our egos and our choices. That’s what happens when the goal we set is “everything will get better.” Everything actually DOES, but there is a leeeetle bit more work to it than if we had picked something more specific. A six-pack still requires work, work-life balance requires thoughtfulness, and increased energy requires sleep. And, for the record, a Whole30 requires a hell of a lot of time in the kitchen.

But here we are, with flatter (if undefined) tummies, smaller bags under our eyes, and a better attitude towards our health. We have more accountability now to ourselves, and each other, because we’ve proved that we aren’t controlled by what goes in our mouth. Which leads to today’s recipe: Righteous Chicken.

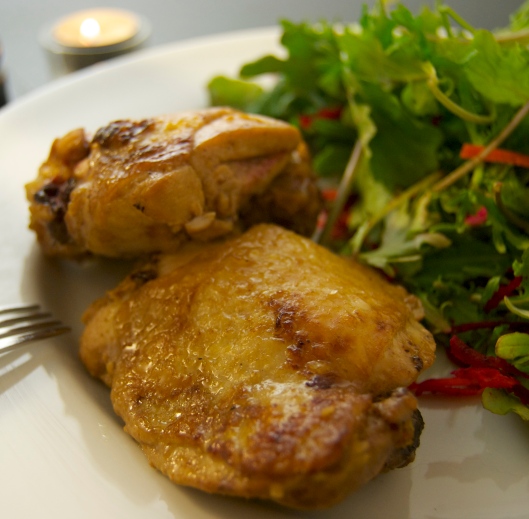
This is a riff on our Heaven Chicken, which is sinfully delicious thanks to the use of gluten-free Tamari in the marinade.  To Whole30 it we tossed the soy and upped the flavour to compensate for the lighter, sweeter coconut aminos. The result: a completely silent meal. We inhaled it rapturously. This is an easy weeknight meal, and it will encourage you that a Whole30 is not only possible, but enjoyable. It may be bold to call the chicken “life-changing” but it was a damn tasty way to get closer to that six-pack.

Ingredients:

  • 8 free-range organic chicken thighs, bone-in, skin-on
  • 3/4 cup coconut aminos
  • 1/4 cup lemon juice
  • 2 tsp fish sauce
  • 3 cloves garlic, minced
  • 1 tbsp ginger, grated
  • 2 tbsp coconut oil

Preparation:

Rinse the chicken under cold running water and pat dry. Place pieces in a resealable plastic bag. In a small bowl whisk together the remaining ingredients and add them to the chicken. Put your right hand in, take your right hand out, put your right hand in, and then shake the bag about. Do the hokey pokey and then turn the bag around, then marinate for 24 hours (boop, boop).

The next day, preheat your oven to 350ºF.  If you have a large oven-proof cast-iron skillet this would be a great time to use it, otherwise you can do what the rest of us peasants do and heat a non-stick skillet over medium-high heat, and prepare a parchment lined baking sheet for later.

Melt the coconut oil in the skillet and place the chicken thighs skin-down for 5 minutes. Move the thighs around every couple of minutes to ensure that the skin isn’t sticking to the skillet. No good having delicious brown skin if it’s going to live forever in your pan, and not your stomach. If you are using a cast-iron skillet, remember to use medium heat only, as cast-iron heats up differently than conventional pans. Once you’ve got a nice brown crust, flip the thighs over, give them two minutes on the other side, then transfer them to the baking sheet and into the oven. Bake for 30 minutes, or until juices run clear.

Bon appétit!

The Evolution of Breakfast

Tags

, , , , ,

Butternut Breakfast Casserole

It is day 7 of our Whole30 today and we have a confession to make. We have been shy about sharing this detail of our Paleo journey, but we can’t go any further through our Whole30 without divulging it:

We are in love with Melissa Joulwan, and think that someday we will all be best friends.

It all started with her first cookbook Well Fed, and the Eggplant Strata. The Shepherd’s Pie, Ras el Hanout and Pad Thai, along with her witty commentary and kick-ass attitude to life drew us in deeper, and we haven’t really lived without her for a couple of years now. Our copy of Well Fed is held together with scotch tape and Sunshine Sauce.

Now we discover that her and Whole30 are like sunbutter and jelly. This isn’t a new thing, we were just slow on the uptake. The past two weeks we have relied so heavily on Well Fed and Well Fed 2, on the information and encouragement Melissa includes in her books and blog posts that our one-sided relationship with her has become borderline creepy. It is time to come out of the closet and share one of her recipes with you, how we use it, and the minor ways that we have modified it to fit our dietary needs.

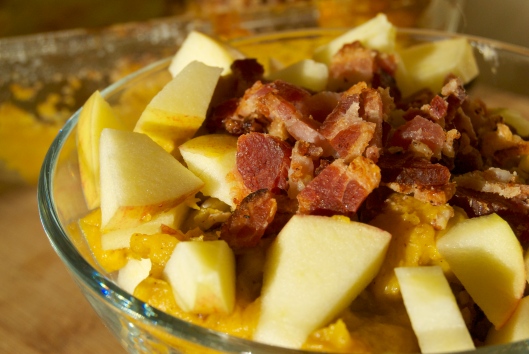
The major focus of week one of our Whole30 has been shifting away from a Savory parfaitnut/seed/fruit based start to the day towards a meat/veggie/fat breakfast. It’s not an accident that this breakfast looks almost identical to the granola of last week. We are, as they say, “in transition.” This recipe starts with the Velvety Butternut Squash out of Well Fed. We made a huge pan of it on the weekend, with two modifications: one, we decreased the amount of garlic out of deference to our patients and co-workers, two, we subbed out the egg for a flax egg to make it allergen-free. Once we had the casserole in the fridge, we could use it as a base for an easy weekday morning breakfast cup. The final flourish was to cook up some Whole30 approved bacon and have it ready and crumbled in a container in the fridge, to be used as the best garnish ever.

We really hope our friend Melissa would approve. And in case she ever reads this: Austin, Texas is a long way from Edmonton, Alberta, but with time and commitment our long distance relationship could totally work. Just saying.

**Do parts one and two on your day off, so you are prepared to do part three only on you work-day mornings.**

Part One: Egg-Free Velvety Butternut Squash a la Melissa Joulwan, Well Fed

Ingredients:

  • 2 1/2 lb butternut squash (we used one large one)
  • 2 tbsp water
  • 2 cloves garlic (down from a whole head)
  • 1 tbsp coconut oil
  • 2 tbsp coconut milk
  • 1/4 tsp Celtic sea salt
  • 2 tsp Ras el Hanout
  • 1 tbsp ground flax seed
  • 3 tbsp water
  • 1/4 cup pecan halves, crushed in mortar and pestle

Preparation:

Follow the directions in the original recipe, reducing the amount of garlic as indicated if you so choose. When you get to the part about the egg, ignore it. Instead, whisk together the ground flax seed and 3 tbsp water in a small bowl, and then pulse that into the squash mixture just until mixed. We didn’t reserve any pecans for garnish, instead sprinkling the whole 1/4 cup of crushed nuts on top of the casserole. Bake as directed, and let cool completely in the fridge. You are now done part one. Don’t worry, part two is way easier.

Part Two: Bacon

Ingredients:

  • 6 pieces high quality nitrite free remortgaged-your-house-for-it bacon

Preparation:

Fry bacon in a sauté pan over medium-high heat until brown and borderline crispy. Remove bacon to paper towel and pat dry. When cool, crumble or cut bacon into small pieces and store in an airtight container in the fridge.

Part Three: Squash Sundae

Ingredients:

  • 1/6 of the pan of butternut squash casserole
  • 1/6 of crumbled bacon
  • 1 apple, washed, cored and chopped

Preparation:

So simple. Layer some apple on the bottom, then some squash, then more apple, then some squash. Or, if you’re feeling crazy, start with squash on the bottom. Choose your own adventure because this story ends with crispy bacon on the top, and a trip into the trusty microwave. Nuke for a minute to a minute and a half, stirring it a little halfway through. Enjoy with a cup of green or herbal tea.

Bon appétit!

Fruity Granola

Tags

, , , ,

Grain free granola

Well don’t we have some explaining to do?!

It has been six months or so since our last post, and it seems only fair to offer a little explanation for the hiatus. We have had two major additions to our life:

Home Sweet Home Rosie

That’s it, that’s the explanation. Told you it was brief.

Our eating habits have done some changing too. Since starting the much-needed basement renovations we noticed a dramatic increase in consumption of potato chips and Rock Creek cider. The sneaky thing was, our increased manual labour and dog-walking time covered up the nefarious effects of these substances for quite some time. Then, I finally got around to doing the food allergy testing my naturopath suggested. For months I had been going through a naturopathic overhaul of my adrenal glands, and was making great progress. The allergy test was the final flourish, the finishing touch on the health project. The results started out okay:

Dairy

Gluten

Soy

Nothing un-Paleo there, and the only surprise was that my gut hates goat cheese just as much as it hates all other types of dairy. Whoops! Then it got a little more interesting:

Eggs

Almonds

Mushrooms

To say my world came crashing down around me is a little bit strong, but it definitely wavered. The unsteadiness may have been due to malnutrition, because I was absolutely starving for three weeks after adopting my allergen-free diet. Josh, being as supportive as he could be, went back to making himself his morning eggs. He also held me in those moments I was so frustrated about what to eat, I couldn’t even speak. Breakfast was the biggest challenge, especially weekend breakfast. It used to be our favourite meal of the day, and we missed sharing it. The emotional and social desire toMorning delish reclaim breakfast, however, led to some shady choices. Weekday breakfasts became protein shakes, because they were fast and easy. Weekend breakfasts began to include a lot of gluten free, but not Paleo, creations. So not only were we making gluten-free pancakes for Sunday morning, but we were putting peanut butter on them in defiance of my not being able to have almond butter anymore. You can see the slippery slope. Throw on some work stress and the holidays and I’m addicted to commercial chocolate (soy lecithin included) and cream in my coffee, while Josh eats full dairy cheese on rice crackers as a bedtime snack. Technically we still eat Paleo the majority of the time, but we know deep down our mindset isn’t as focussed on clean eating and healthy living. So, time for a major reset. It’s not just about keeping me on track with my allergy list. No, this is about the vibrant energy and clear direction we cultivate in our lives, and our observation of decreasing supplies of both. 80% of results come from nutrition, and we have high expectations for our results as people. When we see a downward slide, it is time for action. You guys know what we mean: everything is just better when body and mind are jiving, and Paleo is the style that gets us there.

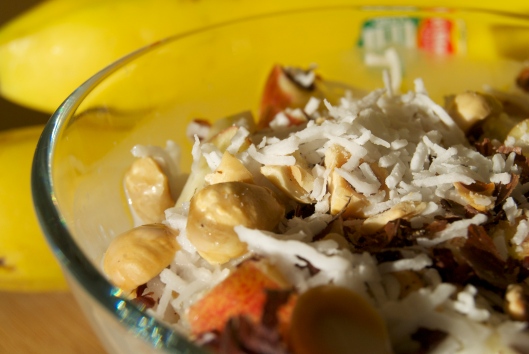
So, where does Fruity Granola come in? Well, this was my one eggless breakfast success this fall, and it has made a comeback in week 1 of our first Whole30. It’s super easy, and a transition from fruity non-food smoothie breakfast to savoury veggie-filled Paleo breakfast.

Ingredients

  • 1/2 to 1 whole firm apple (Gala, Granny Smith, Fuji)
  • 2 tbsp raw cashews
  • 2 tbsp hazelnuts
  • 2 tbsp coconut (unsweetened)
  • 1 tbsp pumpkin seeds
  • 1/4 tsp cinnamon
  • 1/4 cup coconut or cashew milk

Method

Wash and chop your apple, however much of it you’re using. Layer in a microwaveable bowl the apple with a sprinkle of the cinnamon, 1 tbsp cashews, 1 tbsp hazelnuts, 1 tbsp coconut, 1 tbsp pumpkin seeds, the rest of the apple, the rest of the cinnamon, and the remaining cashews, hazelnuts, and coconut. Then pour the milk overtop, and put it all in the microwave for a minute (plus or minus, depending on your micro…ours is old so it takes a minute.) Enjoy with a cup of green tea, and you’ll be going strong for hours!

Bon appétit!

Spicy Meatballs

Tags

, , , ,

Balls in Sauce
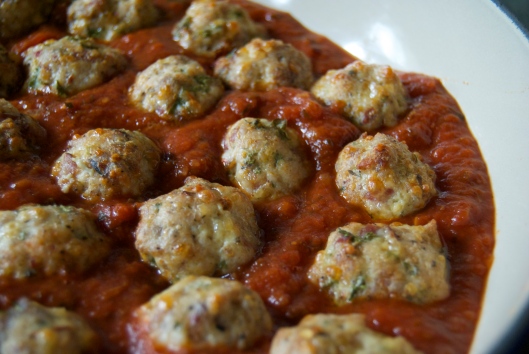
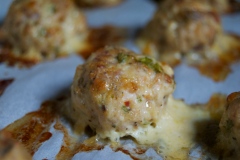
If we could get invited to dinner at the house of a famous chef, we would pick Ina Garten. Barefoot Contessa is always cooking something comforting, authentic, and gloriously ignoring of calorie content. We are battling through prairie spring weather: rain, wind, thunder storms and cool nights. It is gorgeous in the sense that everything is blooming and green, and we’re doing lots of exercising outside so we can soak up as much fresh air as we can. By the time we get home though, we’re usually craving something hearty and warm, to nourish our bodies and comfort our minds while the next thunder storm rolls in. This is an adaptation of Ina Garten’s meatball recipe, made a little lighter, and gluten and dairy free. They are totally delicious, and not your average meatball (nothing with three types of meat can be called average). Make sure to read the recipe ahead of time: we made the mistake of thinking we remembered everything in it, so Josh is currently riding his bike home from the grocery store, combining training for his ride with picking up all the things his cute-but-air-headed girlfriend forgot to put on the grocery list. Did I mention he’s doing this in the midst of intermittent lightening? That’s love, for all of you still looking for a definition.
We make these balls on weekends because they can be made ahead, and then eaten whenever we want them that day, the next day, or later in the week. Once we’re in our own place we’ll take the recipe to the next level and make our own pasta sauce, but for now we have found a tasty brand of organic sauce done by a company called “Simply Natural”. Any fresh-as-you-can-find it sauce will do!
Egg washed ballsBaked cheesy balls
ingredients
  • 650g ground turkey breast
  • 4 organic chicken Italian sausages, casings removed
  • 4 thin slices prosciutto, finely chopped
  • 1 cup grated LF Parmesan cheese
  • 1/2 cup minced fresh parsley
  • 1 teaspoon dried oregano
  • 1 teaspoon crushed red pepper flakes
  • Celtic sea salt and freshly ground black pepper
  • 3 tablespoons good olive oil, plus extra for brushing the meatballs
  • 2 eggs, lightly beaten
  • 2 739mL jars organic tomato and roasted garlic pasta sauce
  • 4 medium/large spaghetti squash

Preparation

Preheat the oven to 400 degrees. Line 2 sheet pans with parchment paper. In a large mixing bowl, combine the turkey, sausage, prosciutto, cheese, parsley, oregano, red pepper flakes, 1 teaspoon salt, and 1 1/2 teaspoons pepper with a fork. Add the 3 tablespoons of olive oil and the eggs, and stir lightly with the fork to combine. Doing it this way keeps the meat less compact than mixing with your hands. With your hands, lightly roll the mixture into 2-inch-round meatballs and place them on the prepared sheet pans. Brush the meatballs with olive oil. Bake for 35 to 40 minutes, until the tops are browned and the centres are completely cooked.
Pour the marinara sauce in a large, low pot, add the meatballs, and bring to a simmer. If you are making these ahead of time, stop here, and put the balls in the fridge in the sauce until you need them. If there are hungry people staring at you and salivating all over your kitchen, carry on.
Bake the spaghetti squash at 400F. To prepare, cut the squash in half, and scrape out the seeds. Place face down on a parchment-lined baking sheet, and pour a couple of tablespoons of water on the parchment. Bake for 35-40 minutes, or until a fork easily pierces through the skin into the meat of the squash. Let cool for a few minutes, then scrape out the squash with a fork into a large bowl. Sprinkle with salt and pepper, and a light drizzle of olive oil, then toss. Transfer squash to a big platter, or into individual pasta bowls. Top with meat balls (3 per person is a good start) and tons of sauce. Garnish with more parsley.
Bon appétit!