Tags
gluten free brunch recipe, gluten free cinnamon buns, gluten free comfort food, gluten free holiday recipes
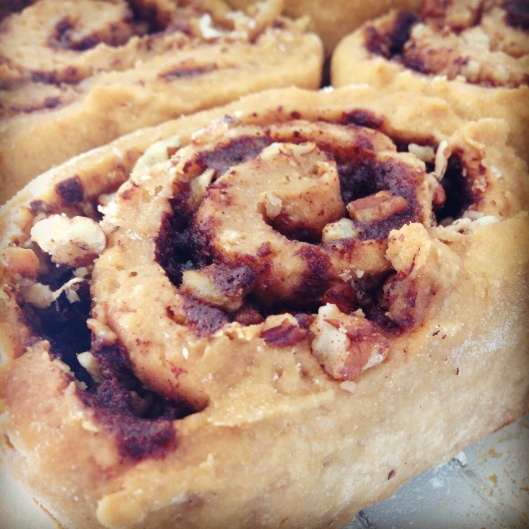 November on the prairies, and winter is absolutely coming. We always seem to take a Paleo break this time of the year. It starts with pumpkin pie at Thanksgiving and ebbs and flows depending how well we’re coping with the snow and cold, usually until a post-Christmas emotional crisis. This year we are facing our pattern directly, planning a November Whole 30 and cross-country ski lessons, but we’ve also been carefully attending to our impluse to eat comforting treats. We have thirty years each of winter traditions to contend with so there is little point pretending that our cravings aren’t there. What we’re trying to do is be selective and smart, so that we don’t end up playing the emotional eating game with ourselves where we deny, deny, deny, then go crazy Halloween through New Years, just to limp along feeling crappy until we do a major diet purge again in January. That’s a lot of stress on our guts and minds that we don’t want this year. It’s a shift from accepting all-or-nothing Paleo dogma to accepting that our body-mind connection occasionally needs some off-spec treatment. This cinnamon bun recipe is an adaptation of one we found online, which was an adaptation of an adaptation of an adaptation. We can’t take full credit for it, but our tweaks minimize the fuel for your sugar dragon, and maximize the comforting smell and flavour. These are great make-ahead for brunch too.
Ingredients
- 2/3 cup coconut milk
- 1 tbsp unsalted butter*
- 1 packet quick-rise yeast
- 1/4 cup coconut palm sugar
- 1/2 cup potato starch
- 1/2 cup brown rice flour
- 1/2 cup almond flour
- 1/4 cup tapioca starch
- 1/2 tsp baking soda
- 1 1/2 tsp guar gum
- 2 1/2 tsp baking powder
- 1/2 tsp salt
- 1 large egg (or equivalent)
- 1/4 cup extra virgin olive oil
- 1/2 tsp vanilla
Filling:
- 1/3 cup unsalted butter*
- 1/2 cup coconut palm sugar
- 2 tbsp cinnamon
- 1/2 cup pecans
*coconut oil should work equally well, if you don’t want to use butter
Method
Having a proper stand mixer is essential to this recipe. Borrow one, barter with your best friend for use of hers, do whatever it takes.
Grease a 9×11″ pan with coconut oil and dust with rice or coconut flour. Place the yeast and 1/4 cup of palm sugar in the bowl of the stand mixer. In a saucepan, or in the microwave, melt the butter in the coconut milk. Use the classic inside-of-the-wrist test, or a thermometer to test the temperature. Too hot or too cold and the yeast won’t do what it’s supposed to, you want it just warmer than body temperature (approx 40C, 110F). Add the milk mixture to the yeast and sugar, mix gently with a wooden spoon and then leave it alone to work for 15 minutes.
Sift or whisk the flours, starches, baking soda, powder, salt and guar gum together in a small bowl.
When the yeast is proofed, add the egg and oil and vanilla to the mixer. Mix on low for a few seconds, then turn the mixer up to medium while you slowly add the flour mixture. Once the flour has started to stick, turn the mixer up to medium-high and let it run for at least a minute and a half. The dough will come together, lose the sticky gluten-free look, and gain elasticity. If it doesn’t, let it run for up to two minutes.
Get your largest cutting board and wrap it completely with good plastic wrap. Wrap all the way around underneath the board, you don’t want it sliding off while you roll. Dust the board with flour and turn the dough out into the centre. Dust the dough with more flour, then cover it with more plastic wrap, so that you’ve completely covered the whole board again. Gently roll the dough out into a rectangle, until it’s half a centimetre thick or so. Carefully peel off the top layer of plastic wrap.
For the filling, place the butter, coconut sugar and cinnamon in a small bowl. Use a pastry cutter to work it into a crumble. Use a mortar and pestle to crush the pecans into small pieces (or chop them finely) and stir them into the sugar mixture. Sprinkle the mixture evenly over the surface of the dough.
To roll up your buns, unwrap the bottom layer of plastic wrap from your cutting board, and turn it so you have a narrow end of the rectangle towards you. Carefully pull the wrap up and way from you, then use your fingers to gently tuck the edge of the dough in on itself, starting a tight roll of dough on dough. Turn the board around, so now the rolled edge is farthest from you and you can pull the plastic wrap towards you, continuing to the familiar log form. Get it as tight as you can on your first go, because it won’t unstick to let you try again! Once you’ve got your roll finished, dust it one more time with some flour, then use dental floss to slice it into eight sections. Don’t worry if you’ve got mint floss, we did too and it didn’t add any flavour to the dough. This is a way easier technique than flouring the blade of a knife, but if you’re out of floss you can do that too (we won’t tell your dentist).
Place the rolls in the prepared pan, and let rise for 15 minutes. At this point, if you’re baking them off right away, you want to preheat your oven to 350F. If you are going to bake them the next morning, cover them with plastic wrap and refrigerate after rising. Let them come up to room temperature the next day before baking.
Bake for 20-25 minutes, or until the tops are golden brown. Cool in the pan on a wire rack, but definitely serve while still warm. If you’re feeling especially indulgent, we recommend a cream cheese icing sweetened with maple syrup, and spiked with ginger and cardamon.
Bon appétit!